No doubt WordPress is the best blogging platform so far. When you start your blog on WordPress, there are a few essential things to do after installing WordPress. Here I have explained all the essential things you need to do.
- 1 | Temporarily hide the site from search engines
- 2 | Remove default Post & Comment
- 3 | Remove Hello Dolly Plugin
- 4 | Setup Permalink Structure
- 5 | Set site Title & Tagline
- 6 | Setup a proper user profile
- 7 | Set a timezone
- 9 | Enable auto-updates
- 10 | Upload Site Icon & Site Logo
- 11 | Set up front pages for blog and home
- 12 | Setup Google Analytics
- 13 | Create recommended pages
- Final thoughts
1 | Temporarily hide the site from search engines
The first thing I do after installing WordPress is I Disable search engine visibility for the site. Why is this important? Search engines like Google, Bing occasionally crawl websites. And if search engines crawl a website that is not configured yet, they will index the pages or the state of the site which you want to index.
You have to configure the website properly before notifying the Search engines. Later, you will have a clear idea of what things need to be configured before enabling visibility to search engines.
How to disable/discourage search engine visibility?

Go to Reading under Settings, and at the bottom of the page, you will find an option Discourage search engine visibility.
Remember to uncheck this setting when your site is fully customized and ready to index on the search engines.
2 | Remove default Post & Comment
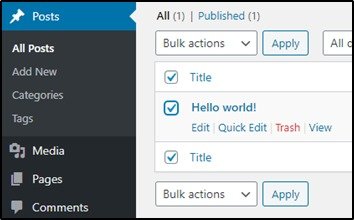
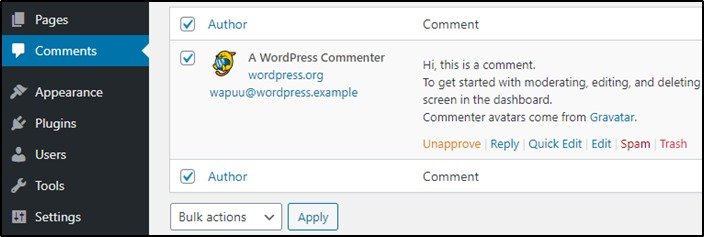
With the WordPress default installation, you will notice one sample post, one sample comment, and one sample page. These are not useful to you, so delete these. To delete sample posts, go to Posts -> All Posts, and there you will find a post Hello World. Similarly, you will find a default comment under Comments and a sample page under Page -> All Pages.

3 | Remove Hello Dolly Plugin
By default, WordPress is installed with two plugins. One is Akismet Anti-Spam, and another is Hello Dolly. The Akismet Anti-Spam plugin is useful; in fact, this plugin is recommended. This plugin helps to filter out spam comments. You can activate this plugin later on.
But the Hello Dolly plugin is kind of useless; delete it. And I also have a list of recommended plugins for blogging in WordPress.
4 | Setup Permalink Structure
Permalink structure is the URL structure you see on the address bar on the browsers. The WordPress permalink structure looks messy. You need to set a clean and understandable permalink structure so that search engines and visitors can understand the URL by seeing it.
To set up the permalink structure, go to Settings -> Permalink Structure. And there, you can pick a structure you want. You can choose only the post-name after the site URL, or you also can add the category before the post-name. There are a lot of options you can select from.
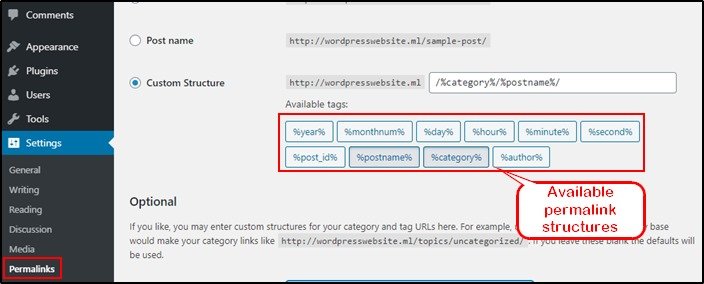
On the above image, I have selected Category & Post name for the permalink. You can select from the options available below. Just delete the existing structure from the text box and select the one you want. Or, you can also select from the common settings available by WordPress.
If you want to change the permalink structure on an established site, it will break the existing links. That means no one (visitors, search engines) will find the pages from the existing link. Your SEO ranking will be hurt. So, it is a good idea to set this up from the very beginning.
Although there is a method to change permalink structure without losing SEO rankings for the established websites,, only follow this if you forget to set up the right structure at the beginning and want to change it now.
5 | Set site Title & Tagline
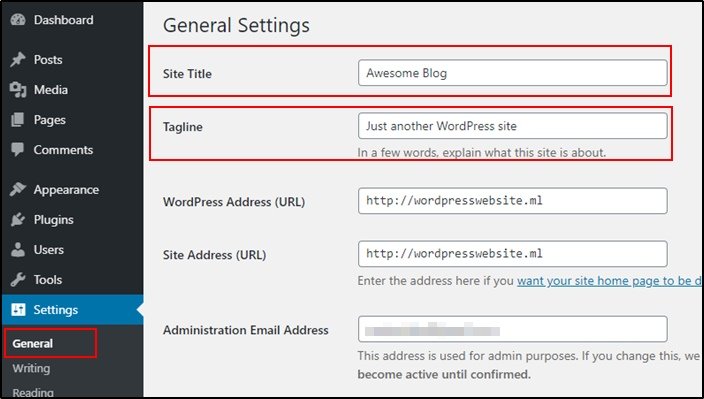
The site title is like the name of the website, and the tagline is to tell the visitors what the site is for. Set a proper title and tagline so that visitors could get an impression of your website.
To set the site title and tagline, go to Settings -> General and set the title and tagline there.
6 | Setup a proper user profile
At the time of creating a user, only name and email ID are required. But when you write a blog post, your user profile should be properly shown there so that the visitors can see who stands behind your awesome blog, how authentic the post is, etc.
To complete your WordPress user profile, go to All Users under Users, and click on the Edit link to edit your user.
You can set your name, how the name should be shown. On the Biographical Info, write a short description of yourself.
To change the profile picture, you need to sign up to Gravatar. By default, WordPress only uses Gravatar image as the user image. But, if you do not want to sign up for Gravatar, then you need to install a plugin for that.
7 | Set a timezone
By default, WordPress sets UTC as the timezone for the newly created sites. You need to change it according to your location, or you can set it to the timezone where your target audience is from.
You can change the timezone by going to the General under Settings.
8 | Install a theme and delete the unused themes.
If you have already selected a theme for your WordPress blog, then install it. Otherwise, you can choose a theme from this list of recommended FREE themes for the new bloggers. Because the default WordPress themes are not so attractive, you need to do a lot of customization on the default themes.
To add a new theme, go to Appearance -> Themes and click on the Add New button to add a new theme.
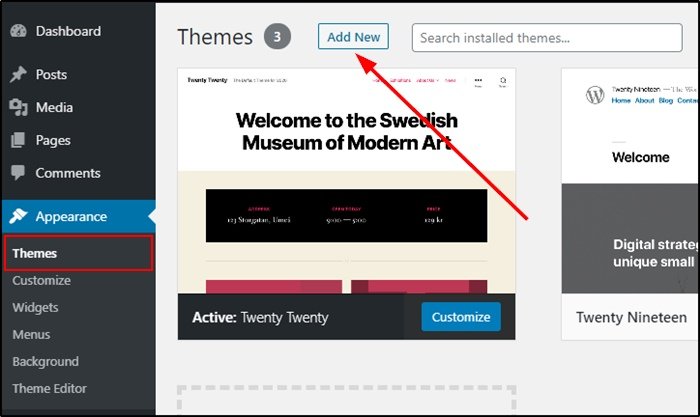
And delete the unused themes, but remember to keep at least one theme by WordPress. So whenever your theme encounters an issue, you can apply the default theme to troubleshoot. WordPress also recommends keeping at least one default theme.
9 | Enable auto-updates
You should always keep your themes and plugins updated. Otherwise, you can face some security issues. You can read here how an obsolete plugin caused security issues.
And the great news is that after WordPress version 5.5, you can set an auto-update for the themes and plugins. So, you do not need to worry about the updates again.
How to enable auto-update for WordPress themes?
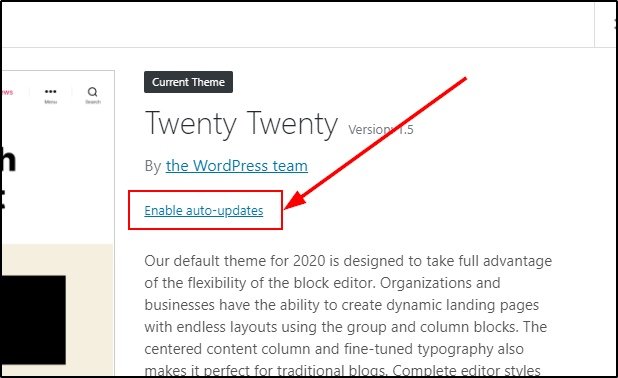
Step 1: Go to Appearance – > Themes and click on the theme you want to enable auto-update for.
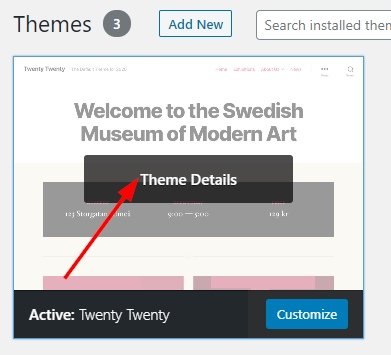
Step 2: Now, you can see an option to Enable auto-updates. Click on that, and the theme will be updated automatically whenever a new version is released by the theme developer. You need to do this for all the installed themes.
How to enable auto-update for WordPress plugins?
Step 1: Go to the plugins page, where you can see all the installed plugins.
Step 2: Click on Enable auto-updates at the right side of each plugin.
10 | Upload Site Icon & Site Logo
Site icons are what you can see on the browser’s top bar before the site title. A proper site icon can create a good impression on the visitors.
And the site logo is the logo for your site.
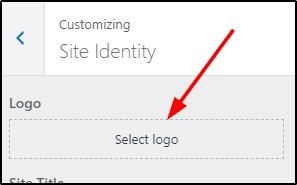
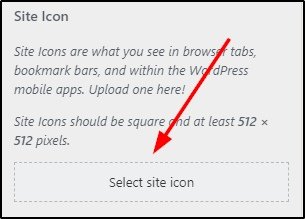
You can set the site icon and the site logo by customizing under the Appearance menu; it will open a new page. Now go to the Site Identity, where you can upload a site icon and a site logo. You can use tools like Canva Logo Maker (easy for anyone) to create a site logo and icon.
11 | Set up front pages for blog and home
The blog page is the page where all the posts will be displayed. And the home page is the page for the site front page; whenever someone opens the site URL, the home page will be loaded.
Be default WordPress sets the home page as the blog page. But you can design a separate page for the home, and after that, you can select a different page to display the blog posts.
To set the home page and the blog, go to Settings -> Reading, where you can see the options to set pages for home and blog.
12 | Setup Google Analytics
After publishing some posts, you will be required to know the performance and user behavior on the site. Google Analytics is a FREE tool by Google that lets you track the user behavior on your site.
So, implement Google Analytics (full guide on how to install Google Analytics on WordPress) on your site.
Or if you can use the Jetpack plugin to show the status of your website. This plugin also adds additional security on WordPress sites.
13 | Create recommended pages
You need to have some mandatory pages to maintain the site authority. Pages for Contact, Privacy policy, and About. These pages are recommended by Google to rank any blog/website.
And don’t forget to add a contact form on the contact page. You can use Jetpack to create a nice contact form, or there are a lot of plugins available to create forms. You can install any of those.
Final thoughts
Above, I have described the recommended things to do after installing WordPress. But, there are lot more things you need to do to run a blog properly. But, no panic, you will learn everything when it is the right time.
The other important thing to do:
- Install SSL certificate if it is not provided by your hosting.
- Set up Cloudflare for security and performance.
- Set up plugins for SEO (Rank Math is recommended), Cache. See this list of recommended plugins for blogging.
You can comment on your valuable suggestions, subscribe (at the bottom of the page) to get more WordPress & Blogging related updates. And also, contact me for any kind of help on your WordPress blog.
ALSO SEE: How to display different sidebars on different posts and pages on WordPress?
- Create Custom Mailbox for Free - December 25, 2021
- How to Enable WooCommerce Autofill Checkout Address with Google - August 15, 2021
- How to Manage Affiliate Links Professionally - August 8, 2021

