Google Analytics lets you track the traffics of your website and the behavior of the traffic(users). You can check the details of users’ behavior on Google Analytics. Some useful features of Google Analytics are…
- Find the number of users who visited your website.
- From where the users are coming(Organic, Social, Direct, etc).
- How long do users stay on your website?
- Which pages are most popular on your website.
- Which age group of the users is visiting your site mostly.
- And many more …
You can add Google Analytics to WordPress using several methods. I have explained two different methods below. These two methods are easy and safe and also beginner-friendly.
But, first, you need to sign up for Google Analytics. If you already have signed up for it then you can ignore the Signing up process and go to the next step.
Google Analytics account creation
STEP: 1
Go to http://analytics.google.com/ and log in with your Google account.
STEP: 2
Enter a name for the Analytics Account. You can use any name here. Click on the Next button to proceed further.
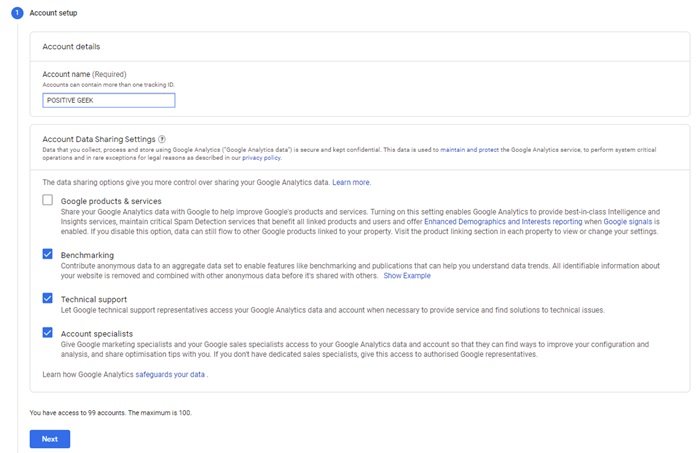
STEP: 3
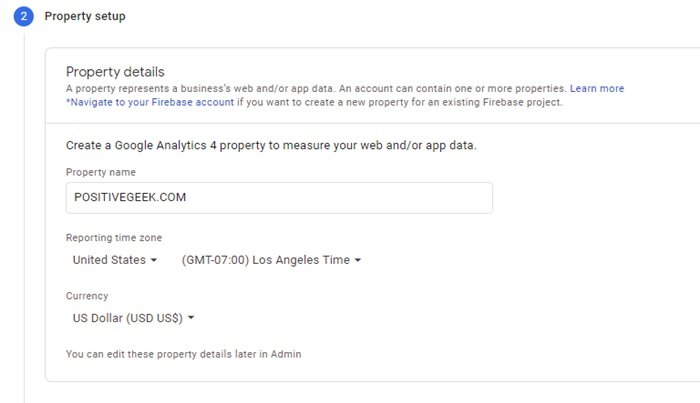
Add a name for the property. You can add multiple properties to an account.
After that select the time zone and currency.
STEP: 4
Under the Advanced options, you can create a Universal Google Analytics Property. This is optional. Some WordPress plugins still use the earlier version of Google Analytics. In that case, you need to add this.

STEP: 5
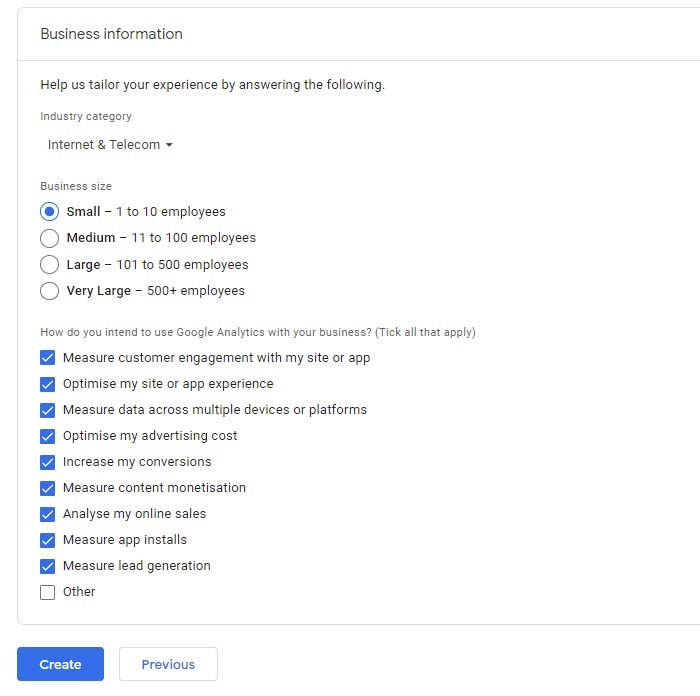
Fill in the Business Information for the website. You can select the options according to your business. Finally, click on the Create button.
STEP: 6
On the Terms of Service Agreement window select the country and accept the agreement.

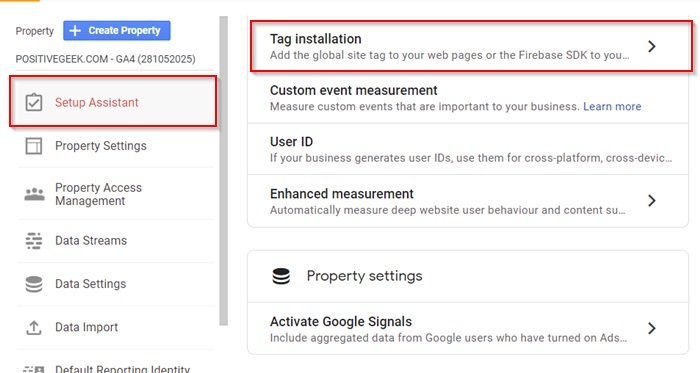
STEP: 7
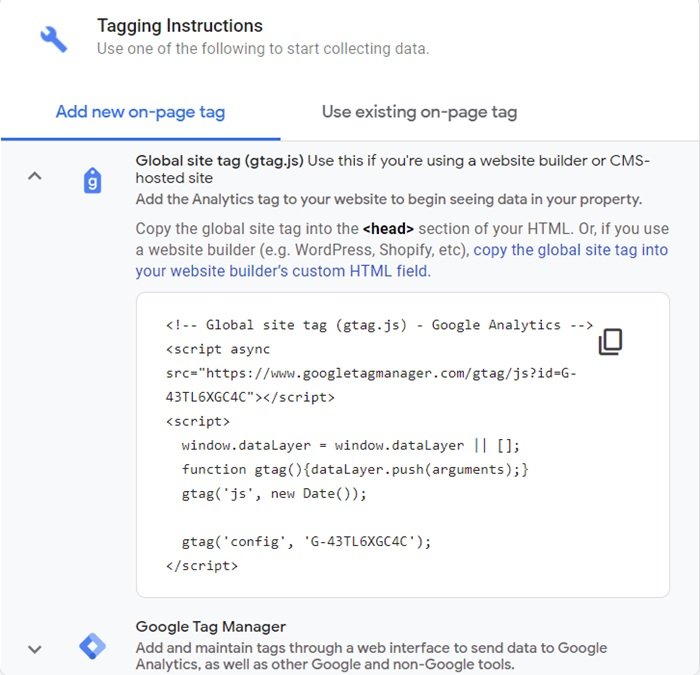
Under the Setup Assistant menu select Tag installation to find the Google Analytics code. You need this code to install on the website.
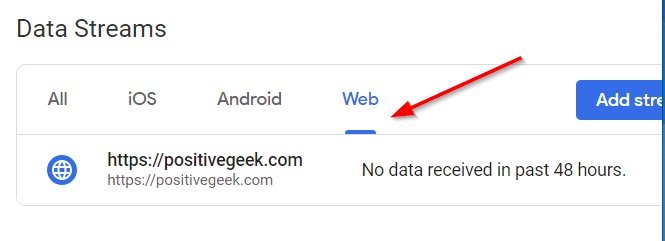
STEP: 7
Select Web on the Data Streams option and select the website.
STEP: 8
You can see the Google Analytics code under the Global site tag option. Copy this code to add it to your WordPress website.
Add Google Analytics to WordPress by adding the code to the theme header
To connect Google Analytics to your WordPress website you can choose this method. This is the recommended method if you do not want to compromise the loading speed by adding more plugins(Though not all the plugins slower down the load speed of the website).
For this method, you need to paste the Analytics code to the theme’s header.php file. I would recommend you to create a child theme and customize it with codes on the child theme. So that you do not lose any codes when the theme updates.
After creating the child theme activate the theme ( Also you can do it on the main theme if you do not want to create a child theme).
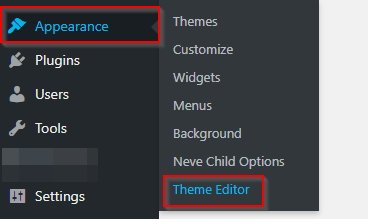
Now go to Appearances -> Theme Editor.
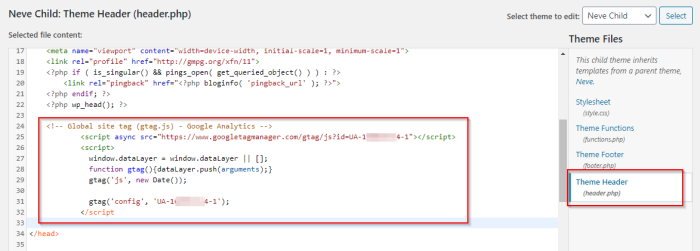
It will open the code editor for the theme core files. Select the theme here (the current theme is always selected). Select the header.php from the right. Paste the Analytics code before the closing of the </head> tag as in the image below.
Now update the file. Google Analytics is now successfully integrated with your WordPress website.
You can measure the traffic details from the Analytics window.
NB: When you will change the theme, you need to paste the same code on the new theme’s header.php file.
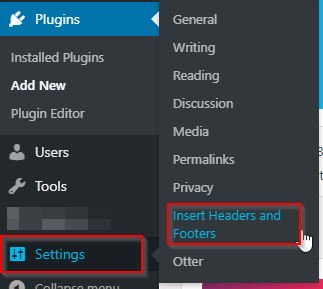
Add Google Analytics to WordPress by Insert Header and Footer Plugin
You can add Google Analytics to WordPress by using the Insert Header and Footer plugin. This plugin will push the Google Analytics code to the page when the page will load. For that, you need to install the plugin. This plugin has more than one million active installations.

After installing the plugin activate it. And go to Settings -> Insert Header and Footer.
Now on the Scripts in Header box paste the Google Analytics code. And save it.
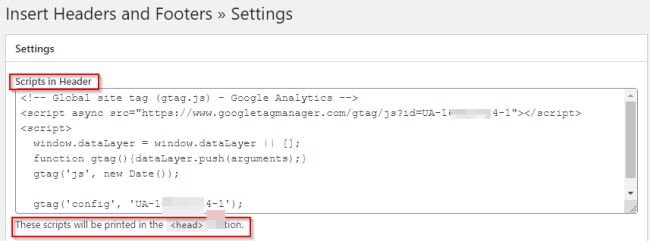
You can check this plugin will do the same job as I explained in the manual method. It will push the code between the <head> tags of the website.
Final Thoughts
Both methods explained above are beginner-friendly and easy. You can add Google Analytics by following any one of the methods.
The manual method, by adding the analytics code to the theme header file is the method I use on the WordPress websites.
Remember, when you will change the theme you have to add the code again to the new theme’s header file.
You can choose the second method (with the plugin) if you are not comfortable with adding codes to the theme files.
You can ask me for any query. I will definitely get back to you.
Jaded by the 9 to 5 work as an executive in charge of a large enterprise department`s technical direction, he made his way back to his passion. More than dozens of created websites later, he is now an author of a range of programming courses for beginners up to first-rate working professionals.
Write him to nur@positivegeek.com
- Create Custom Mailbox for Free - December 25, 2021
- How to Enable WooCommerce Autofill Checkout Address with Google - August 15, 2021
- How to Manage Affiliate Links Professionally - August 8, 2021


Great info! Very helpful!
Thank you! Keep visiting for new contents.