You already have many options to backup a WordPress website through some plugins like UpdraftPlus. And almost every good web hosting provider provides a free daily/weekly backup, where the database and the files of the website are backed up smoothly. No headache for the webmasters.
But you can backup a WordPress website manually (without any plugins) from cPanel. This becomes useful when you need to take an immediate backup of the website or you want to migrate your website to a new web host. And it will create an offline backup for the website.
And this task is a bit technical, but anyone can perform this using this step by step guide.
BACKUP OF THE WEBSITE FILES
Create a backup on File Manager
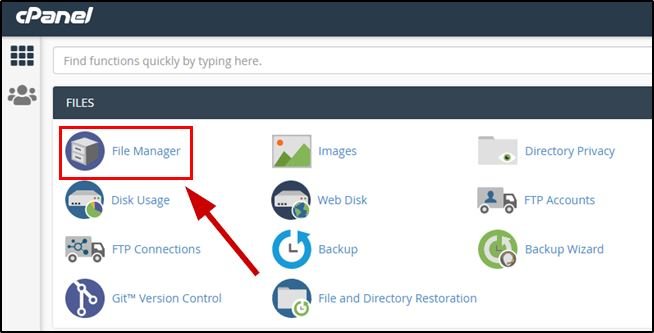
Step 1, on your web host you have to open the File Manager, this is where all the files are located.
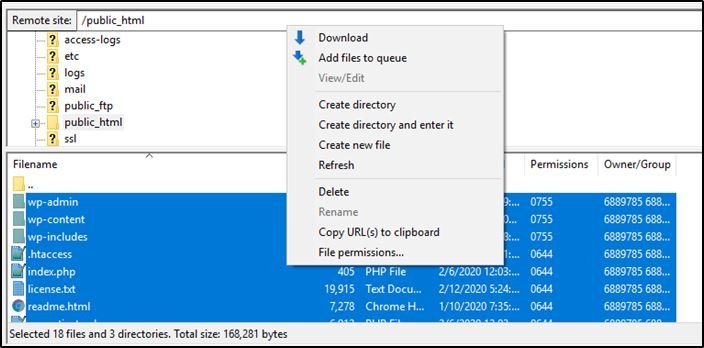
You will see a folder under the File Manager named public_html, this is the root folder of the website. All the files (media, HTML, CSS, JavaScript, and all other files) are stored here.
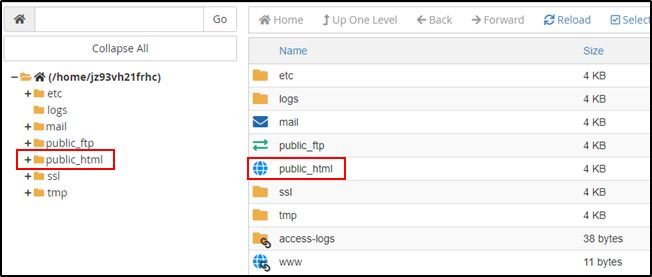
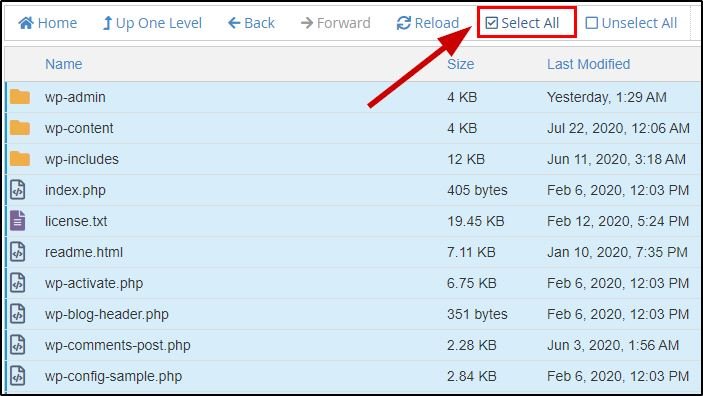
Step 2, Open the public_html folder. You can see the whole list of the files and folders, These are the files responsible for running your website. You need to download these as a copy of the backup. Select all the files and folders under it.
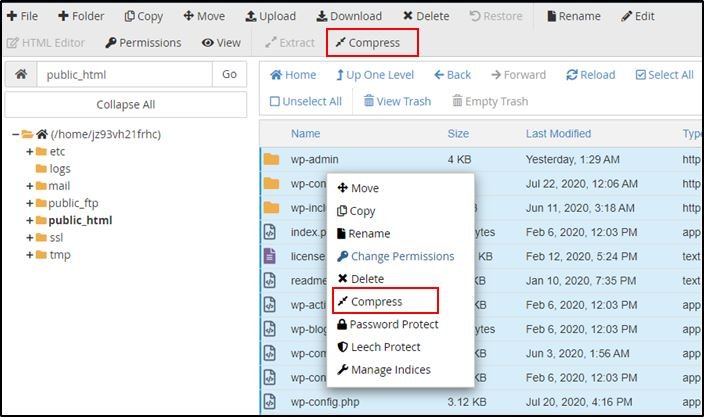
Step 3, Now you need to compress all the files and folders into a zip file. If you want to download the files without compressing these, it will take a lot of time, or it may lose some files at the time of downloading.
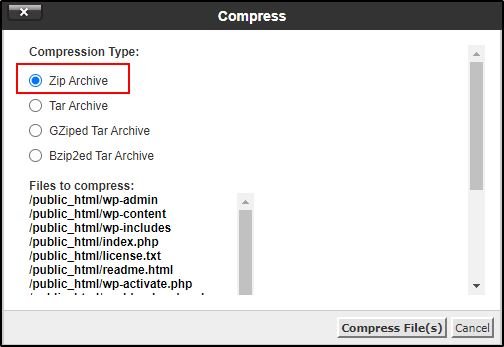
You can compress these by clicking the compress button on the page or compress these by right-clicking on a file and select compress option.
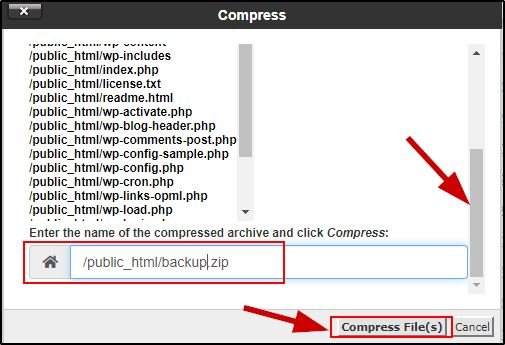
Step 4, now select the zip format. You can select any of the formats which can be unzipped easily on your computer. Scroll down the bar and type and name for the zip file. Make sure to keep public_html/ before the file name, this will store the zip file on the public_html folder. And click on the Compress file(s) button at the bottom. It will take a moment to compress the files, depending upon the size.
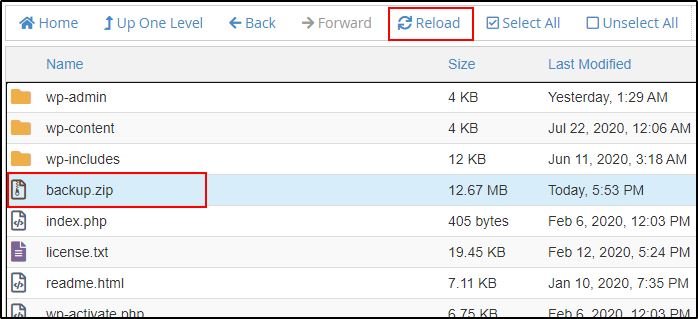
Now you can see a file named backup.zip (or name you put earlier), if you can not see the zip file then refresh the page from the reload/refresh button available on the page. You have to download this zip file only.
Download the backup on computer
The backup is ready. It is time to download the backup file to the local computer. Though you can download the backup file from the cPanel. But your web server may break the download process and it takes too long to download from there.
The best practice is to download the backup using an FTP client. For this, you need to connect the FTP client like FileZilla with the web host. Check this beginner friendly guide to set up FileZilla FTP client.
Download backup through FTP
Connect FileZilla or any other FTP client with your web host.
Locate the public_html folder and select the backup file you created.
Select a folder/drive at the left panel where you want to save the backup file.
Right-click on the file and select download or you can double-click on the file to download it.

Now open your website files saved to your computer. You can locate the backup file on the folder you selected at the time of downloading.
Download backup through cPanel
You can download the backup from cPanel, but try to avoid this method. If the size of the backup is less you can choose this method. Select the backup file and click on the Download button or right-click on the file and select download to download the backup.
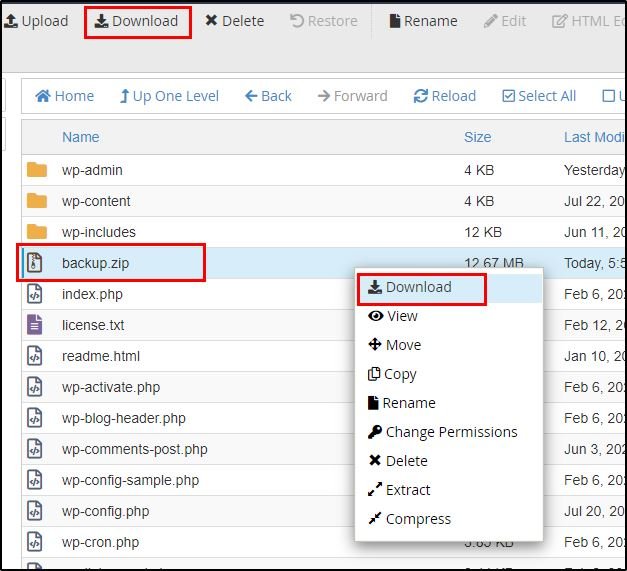
The download process will start instantly and will complete depending on the file size.
BACKUP OF THE DATABASE
For WordPress websites the database is located under phpMyAdmin. You can download the database from there only. And this process is also easy to do. So let’s back up the database.
How to backup a database from phpMyAdmin
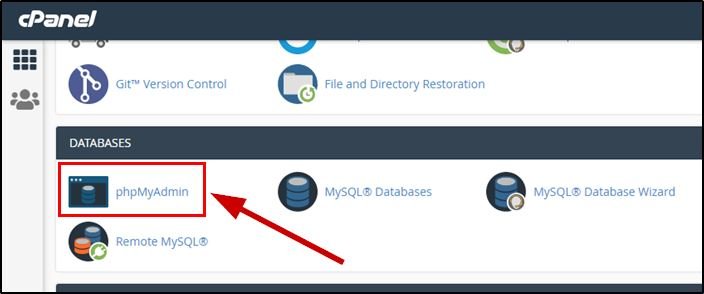
Step 1, on the cPanel find phpMyAdmin. From here you will get access to the database and the tables.
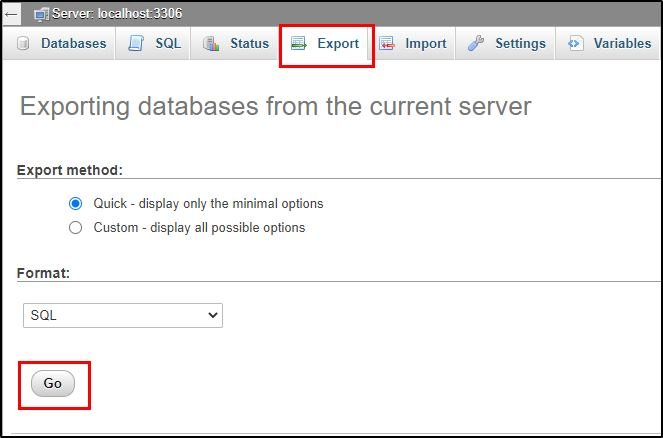
Step 2, on the database page, go to the Export option, it will allow you to export the database to a local file.
Select the Quick method and make sure to export the database in SQL format. Finally, click on the Go button.
The database will start downloading and it will automatically be saved in the default download folder on your computer. Now you can use the database as a backup of your website.
RESTORE/MIGRATE THE DATABASE
When you need to restore the database to a state you backed up you have to delete the old database and create a new one on the cPanel database tool. After that, you can import the backed up database.
For migration to a new web host you just need to create a new database on cPanel and import the downloaded one. In case of migration to a new step follow from Step 3.
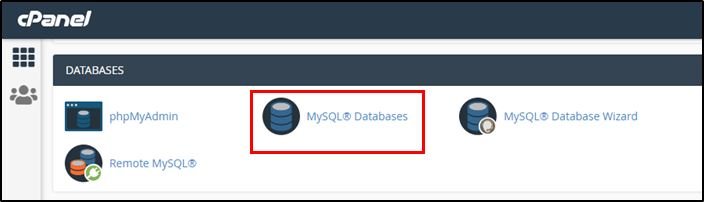
Step 1, on cPanel window select MySQL Databases. All the databases are located under this.
Step 2, under the Current Database option, click on the Delete link to delete the database. It will prompt once for your confirmation. Confirm it to delete the database permanently.

Step 3, now you need to create a new database. To create a new database go to MySQL Databases form the Cpanel.
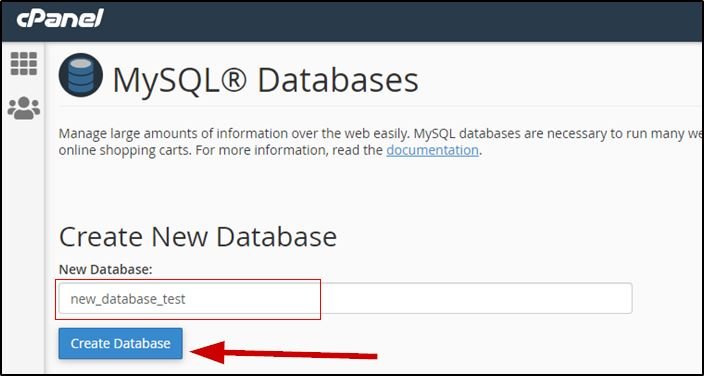
Step 4, under Create New Database type a name for the database and click on the Create Database button. A new database will be created.
Step 5, this step is for the one who is migrating to a new web host. To restore on the same web host follow the next step.
Now you need to create a user for the database. Under MySQL Users add a new user with a new password.

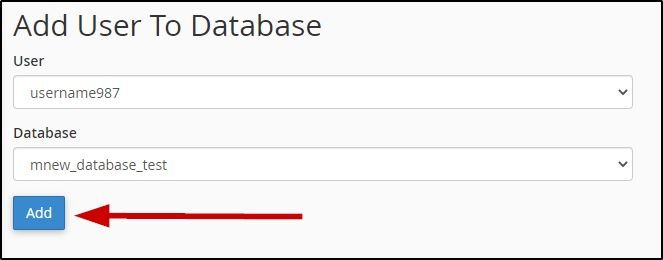
Step 6, now you need to add the user to the database. Under Add User to Database select the user and database and click on the Add button.
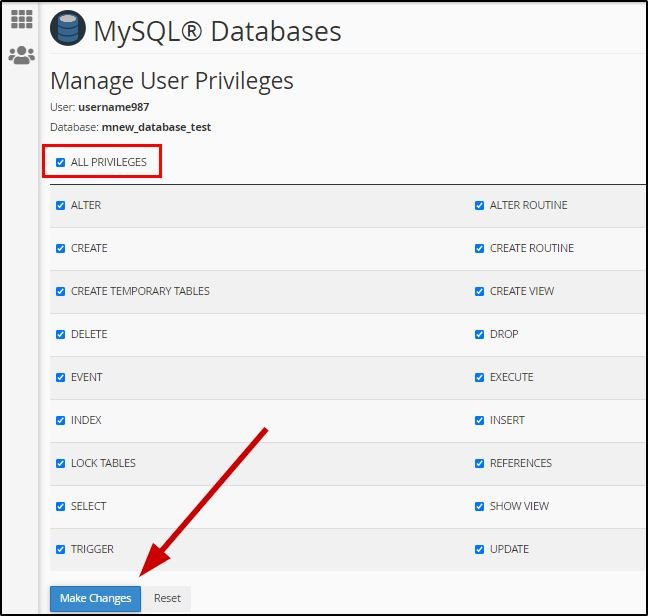
Step 7, on the next screen, select all the privileges to the user for the database and click on the Make Changes button. This will provide all the authorizations to the user.
Step 8, now it is time to import/restore the downloaded database to the new one. For this open phpMyAdmin from cPanel.
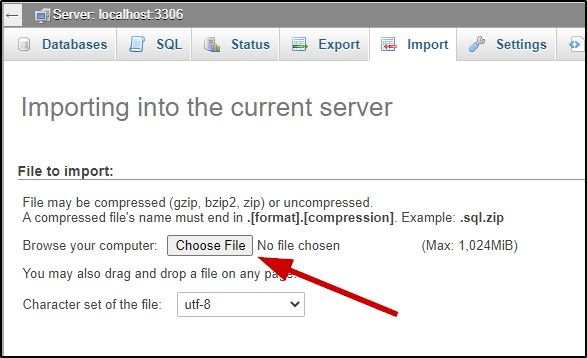
Step 9, go to the import tab and select the Choose File.
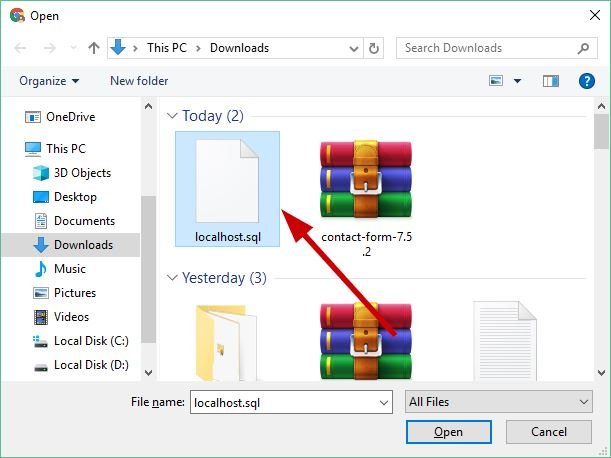
Step 10, Select the database and click on the Open button.
Step 11, now at the bottom click on the Go button to start importing the database.
Your database is restored/imported successfully. Now you need to restore/import the website files.
RESTORE/MIGRATE WEBSITE FILES
If you are restoring the website from a backup, first, you need to delete the existing files under the public_html folder. For the migration, if any file exists under the public_html folder delete those.
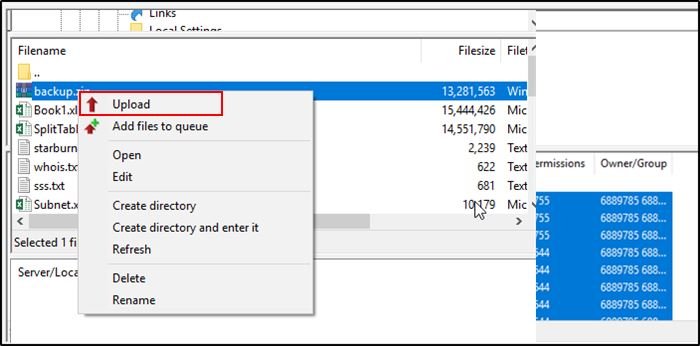
Upload the files using the FTP method(best method)
Step 1, connect the FileZilla client with the host and go to the public_html folder. Select all the files under it and delete them. It may take some time depending upon the size.
Step 2, now upload the backed up zip file.
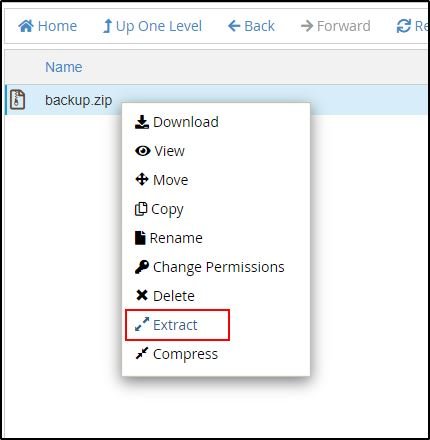
Step 3, now go to File Manager on cPanel, open the public_html folder under it. You can see the zip file there. Now it is time to extract the file to restore the website. Right-click on the zip and click on Extract. At the time of extraction select public_html to extract all the files.
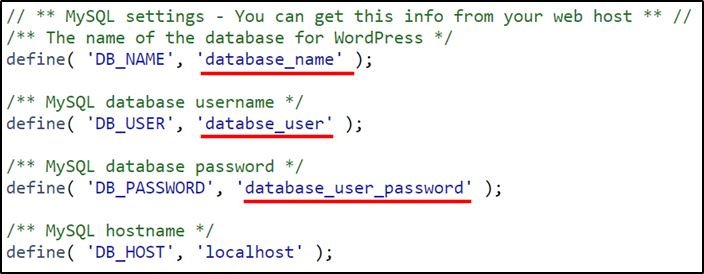
Step 4, now you need to configure the wp-config.php file with the database and user details you created. Right-click on the wp-config.php file under the public_html folder and click on Edit.
Here you need to set the database name, database user and database password. Write these accordingly as you created earlier and save the file.
Now your website is ready. You can check the website, it will open as the time of back up taken.
SEE ALSO: Reasons to use the Jetpack plugin
WRAP UP
This easy step by step backup and restore process will help people to do the task manually with ease. You can follow these steps to migrate to a new web host. One additional step you need to do when you are migrating is to point the domain to the new web host. And you will get help from the web host for this.
Any queries and suggestions will be appreciated. You can comment your valuable opinion in the comment form below.
Jaded by the 9 to 5 work as an executive in charge of a large enterprise department`s technical direction, he made his way back to his passion. More than dozens of created websites later, he is now an author of a range of programming courses for beginners up to first-rate working professionals.
Write him to nur@positivegeek.com
- Create Custom Mailbox for Free - December 25, 2021
- How to Enable WooCommerce Autofill Checkout Address with Google - August 15, 2021
- How to Manage Affiliate Links Professionally - August 8, 2021


Best method step by step to take the backup of the website. Thanks for sharing.
You are welcome!
And thanks for stopping by.
Great tutorial! I am definitely bookmarking it for future reference 🙂 .
Great to know that…
I thought one can make a backup of a site only with plugins. Following these steps releases you from using additional plugin (which could slow down the site speed) and manage your site without being afraid to spoil something irreversibly 🙂
Thank you for the helpful info!
Yeah! Don’t know about others’ experience, but I personally felt that backup plugins take too many resources on the server and decrease the site’s loading speed.
Great to know that you find this article helpful.
I am searching on google how to backup wordpress website and I find your post. Hopefully, now we can backup WordPress website easily. Thank you!
Thank you so much, Sir…I hope this works too in an XAMPP/ Localhost environment…For it’s always good to know how to backup a WordPress site when you can not even acces to it for logging issues.