You can install WordPress locally on a computer and use it as you can use it on a web host. In this article, I have explained how to run WordPress locally using some free applications available online. This guide is applicable to running WordPress on all the popular operating systems out there.
The offline WordPress installation will help anyone to get their hands dirty (testing) before working on a live WordPress site. You can install as many as WordPress and customize these, test different aspects.
Here you will learn the step-by-step processes on three popular applications (XAMPP, WAMP, and MAMP) to install WordPress. You can choose any application out of these three.
Run WordPress using XAMP on local computer
XAMPP is the most popular application to run WordPress on a local computer. You can install it on a Windows computer, on a MAC, also on a Linux computer. The setup of XAMPP is very simple, just like any other application. Follow the steps below for a complete guide on running WordPress using XAMPP on a local computer.
Step 1, get the XAMPP installer from its official website. Select the one which is compatible with the operating system your computer is running on.

Step 2, run the installer with the default settings. You can change the installation folder at the time of installation. By default it will be installed on the C drive, a folder with the name of xampp will be created.
Step 3, start the XAMPP Control panel after its installation. Here you need to start Apache and MySQL to run WordPress. Apache will act as a communicator between the browsers and the web server, and MySQL will handle the database part.

NOTE: If you see any issue on starting Apache as on the above image, “Port 443 in use by….“, you need to change the port for it. Some other application is using the same port.
To change the port, click on the Config button, select Apache(httpd-ssl.conf). It will open a text file, search for Listen 443 on the file and replace the 443 with 4430. After that, it will work fine.

Each time you will run XAMPP, you need to start both the modules. But you can set up auto-start for the modules. For this, click on the Config button at the top of the XAMPP Control Panel and check Apache and MySQL under the Autostart of modules. Save the changes.

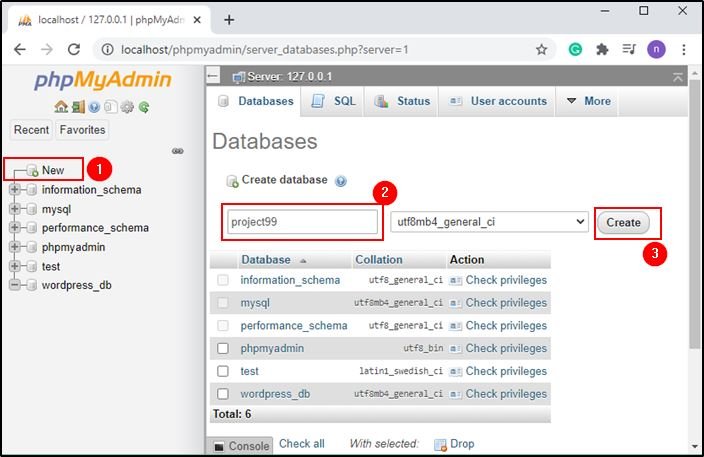
Step 4, the XAMPP server is fully set up. Now you need to create a database and install WordPress. To create a database open localhost/PHPMyAdmin on a browser or click on the Admin button on MySQL on the XAMPP control panel.

Step 5, on phpMyAdmin page create a new database. Click on the New button, type a name for the database, and click on the Create button. A new database with the name will be created.
Step 6, now download WordPress from the official website. Unzip the files and copy all files to C:\xampp\htdocs\project99 ( Select the drive where you installed XAMPP, in my case, it is C drive, and rename the project99 with a name you want)

Step 7, it is time to configure WordPress. Open a browser and open localhost/project99 (project99 is the folder name on the htdocs folder). Select a language and continue.

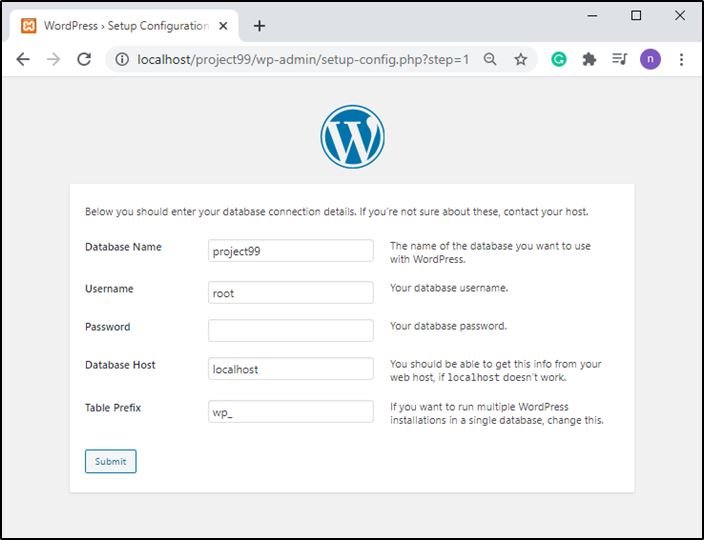
Step 8, you have the database details ready, go to the configuration screen. Write the database name on the Database Field as you created on Step 5. The database username is root for phpMyAdmin on XAMPP. Leave the Password field blank, as by default no password is set for the root user. Database host is localhost, and table prefix is wp_ by default. Submit the details.
If everything is configured properly, you will get an option to Run the installation.
Step 9, now write a title for the site, create a username and password for the WordPress admin dashboard. Email-id is required to communicate with you by WordPress.

It will take a moment to configure everything for you. After the successful installation, you will get the option to log in to the WordPress dashboard. You also can get the login page by typing /wp-admin after the site name (like localhost/project99/wp-admin).

Login to the dashboard with the username and the password. Now you can configure the site with themes and plugins and can customize the look and feel of the site according to your requirements.
Run WordPress using WAMP on local computer
WAMP Server is also as popular as XAMPP for running WordPress or any PHP application on a computer locally. It also gives you the freedom to add unlimited sites. Let’s go through the step-by-step guide on the WAMP Server configuration for WordPress.
Step 1, download the WAMP server from SOURCEFORGE.
Step 2, install the application. You can go with the default setup process. After installing, run the application. You can see the WAMP Server icon on the notification area. Wait until the icon turns into green if the color does not turn into green restart the WAMP Server.
Step 3, now you need to create a database for your WordPress you are going to install. To create a database, open a browser and go to localhost/phpmyadmin. If you see a login window, type root on the username and leave the password blank.
Create a new database from the New option, write a database name, and click on the Create button.

Step 4, now download WordPress from the official site. Unzip the files on the www folder under the WAMP installation folder. Put all the files in the folder which will be the site address.

Step 5, now it is time to install and configure WordPress. Open a browser and go to localhost/wordpresstest (replace wordpresstest with the folder name you created under the www folder).
Select a language for your WordPress site. You can change this language later. Go to the database configuration page. Fill the database details.
Write the database name as you created in Step 3. The database username is root by default. The database password is not set, so leave it blank. And leave all the details as they are. Click on the Submit button.

If all the details are filled correctly you will see a success message. And it will let you redirect to the Installation page. Install it, and after the installation, you will need to configure it for a site title and admin login credentials.
Write a title for the site. Create a username and password for the admin. An email ID is also required for the admin user.

After the successful installation, it will give an option to the WordPress admin dashboard. You also get the login screen by typing /wp-admin after the site-name.
You are ready to customize and edit your website as per your requirements.
Run WordPress using MAMP on local computer
MAMP is good for the users who do not want a lot of options other than the WordPress server. It has a premium version, but the free version works well for WordPress or any other PHP application.
Step 1, download the MAMP installation from its official website. Select the one compatible with the operating system your computer is running on.
Step 2, install the setup. By default, the setup will be installed on C drive with a folder named MAMP. You can select a different location for the installation (not necessary).
Step 3, run the application. Wait for the green button after Apache Server and MySQL Server. These two modules will be responsible for running the WordPress on your computer locally.

Step 4, open a browser and go to localhost/phpMyAdmin, where you need to create a database for the WordPress site.
Click on New to create a new database, write database name, and click on the Create button. A new database will be created instantly. This database will be used on the WordPress site we are going to install on the next steps.

Step 5, download WordPress from the official website. Unzip the files on a folder on the htdocs under the MAMP folder on C drive.

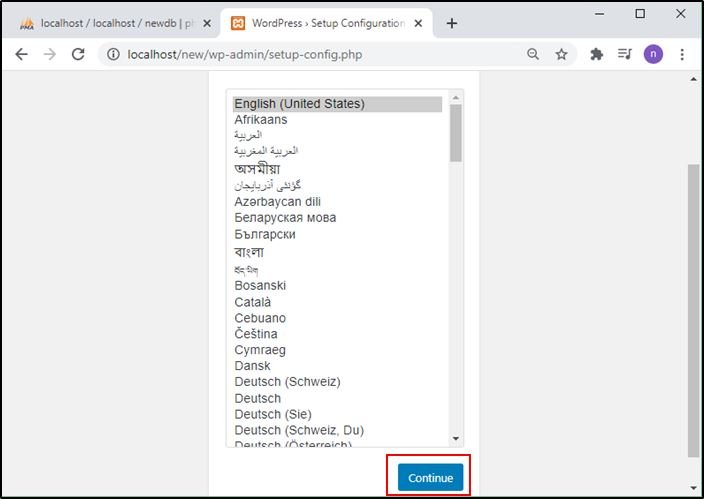
Step 6, open a browser and open the link localhost/new (replace the new with the folder name on htdocs folder). Select a language, continue to the installation process.
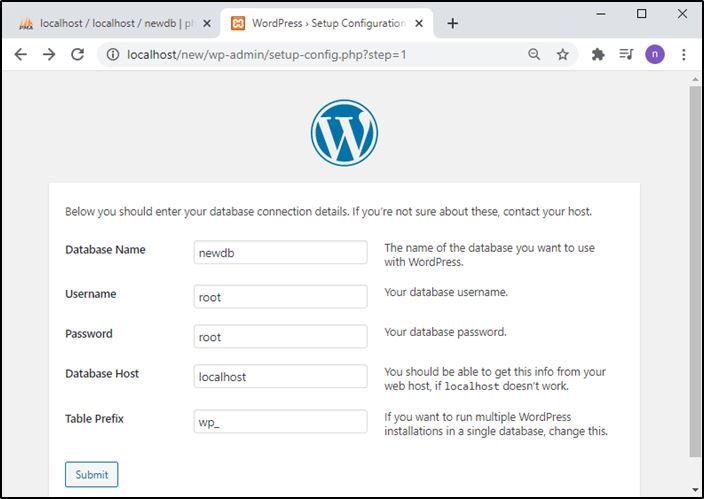
Step 7, you have the database details ready with you. Move to the configuration screen.
Write the database name as you created in Step 4. The default username is root. The database password is also root for MAMP MqSQL Server. The database host is localhost. And the table prefix is wp_, you can change it to something else, but it is not necessary for local installations.
After filling all the details, click on the Submit button.
If all the details are filled correctly you will see a success message. For any error go back and fill the database details correctly.
Step 8, on the next screen you need to create a site title and login credentials for the WordPress dashboard.
Write a title for the site, create a username and a password. You also need to provide an email for the admin account.
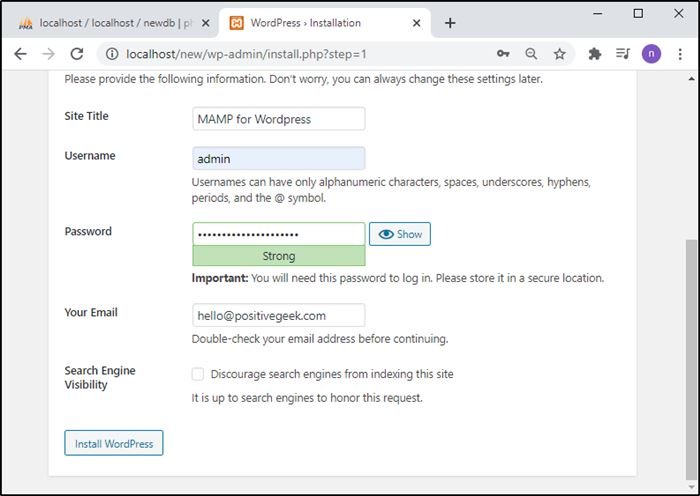
The WordPress setup is done. Now you can log in to the WordPress dashboard on localhost/new/wp-admin (replace new with your folder name) with the admin username and password. Add new themes and plugins and customize everything according to your needs.
Install & Run WordPress using LocalWP
Jaded by the 9 to 5 work as an executive in charge of a large enterprise department`s technical direction, he made his way back to his passion. More than dozens of created websites later, he is now an author of a range of programming courses for beginners up to first-rate working professionals.
Write him to nur@positivegeek.com
- Create Custom Mailbox for Free - December 25, 2021
- How to Enable WooCommerce Autofill Checkout Address with Google - August 15, 2021
- How to Manage Affiliate Links Professionally - August 8, 2021

